
This DIY Ugly Christmas Sweater Nails tutorial will be your solution to longer lasting holiday cheer (without all the dry cleaning).
Most people say that you can’t start prepping for the holiday season till after Thanksgiving. But I don’t. Why can’t you get into the holiday cheer just as soon as you see fit? For me, it’s pretty much right after Halloween. You can take it slow, though. One of my fave ways to get my holiday cheer on and start celebrating the holidays is with nail art. To get your nails as holiday ready as you are, try this ugly Christmas sweater nails tutorial.

The things you’ll need for this manicure are as follows: a bright red nail polish, white nail polish (or white acrylic paint), nail art striping tape, nail art stamps if you want to get fancy, clear top coat, and not shown are a tiny paint brush and tiny dotting tool. You can also grab a glass of wine and put on your favorite holiday movie because the more fun you have with these nails the better.

Most holiday sweaters have a graphic snowflake design and so must your nails. The easiest way to get the snowflake is to use striping tape to make an asterisk shape. You’ll need to peel off the tape but you don’t want the nail polish to seep under it so press down on the tape to get a good seal, just don’t press too hard.

Fill in each space with a diamond shape using white nail polish. The white polish I used for this tutorial was too thin to get a bright white on top of red, so I had to use acrylic paint instead. Try to do your diamonds pretty quickly, because you’ll need to take off the tape while your polish (or paint) is still wet to get perfect lines.

Like these lines! Just kidding, they’re far from perfect. To fix any overflow of the white paint, use the red nail polish on a dotting tool to cover it up.
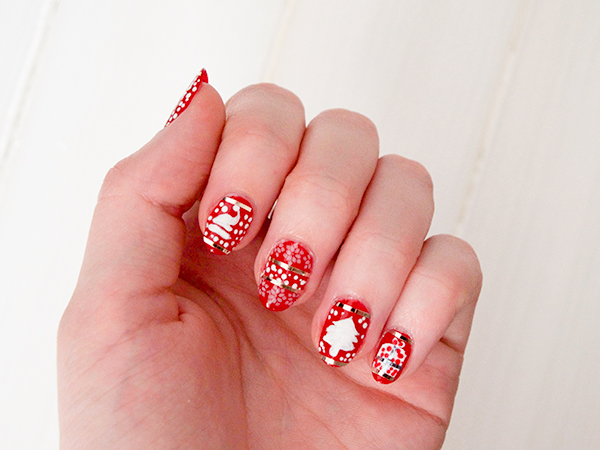
Let’s pause the nail art right here to chat about how to make this manicure not look totally insane. I’m planning on doing each nail with a different pattern for ultimate pattern ugliness but I don’t want them to be a total disaster. So to tie each nail together I’m only using the red and white, and each nail will have two lines of silver striping tape.

Tie all the nails together with polka dots. This is super easy to do with a dotting tool. I went a little wild with these but I love the look because it reminds me of a real ugly Christmas sweater I used to have.
READ MORE: DIY Carrera Marble Nails

Now that I’ve shown you one flawless ugly sweater nail, I’ll show you how things can go wrong. I tried to use my nail art stamper to make a Santa hat on this nail. But, because the white nail polish wasn’t pigmented enough, it looks super faded. And, when you use a nail art stamp, you can’t really re-do it. So to fix this I used the stamp as a template and painted the hat with acrylic paint.

Here is the final manicure! For each of the following nails I just chose a center piece (like the snowflake on the thumb). The Santa hat, tree, and present were pretty easy to free hand paint with a thin brush. The only finger without free-hand painting was the middle finger; I just used the nail art stamp to create a snowflake theme.

Will you be attempting ugly sweater nail art this holiday season?
Love this article? For more beauty, style, travel, and trending topics check out The Luxury Spot on Facebook. Like us and we’ll love you back!