
Love the perfect cat eyeliner look that seems to be everywhere? Here’s how to DIY.
So long as we are chatting about elusive eye makeup techniques (cut crease anyone?), let’s talk about nailing the perfect cat eyeliner. Getting a cat eye flick to look good can be a serious struggle. Makeup brands finally caught on and have started making things like cat eye stamps and stickers to make things easier. The problem with these “easy cat eye in half a second” type products is that they are one size fits all. No one’s eyes are the exact same size and shape. So unless you have the perfect, cookie-cutter eyes the stamp was based off of, it’s just not going to be simple. To truly get the perfect cat eyeliner, you’ve got to do it yourself.

To make things easier we’re starting off with a clean slate. You can (and should) do a cat eye with whatever smoky goodness you want on the eyes. But for the sake of showing you what’s going on, a bare lid is easier. Let’s just note here that if you are going to wear a cat eyeliner all day and want that flick to be sharp and not smudge or transfer, you should use an eyeshadow primer. The key point here is to use it on your lid, obviously, but to also prime where the flick sits outside your lid.

First plan of attack is to line your lid. The liner I’m using in this tutorial is the H&M Aqua Liquid Eyeliner, my favorite low budget liquid liner. When lining your lids, keep in mind that you want the inner corners to be the thinnest line and have it gradually get thicker. I start with just the tip of the liner, lightly brushing from my inner corner. When I have gotten about 1/3 of the way into my lid, I lay the liner brush flat against my eye to line. Then just use the tip of the liner again to make sure you’ve got an even line.

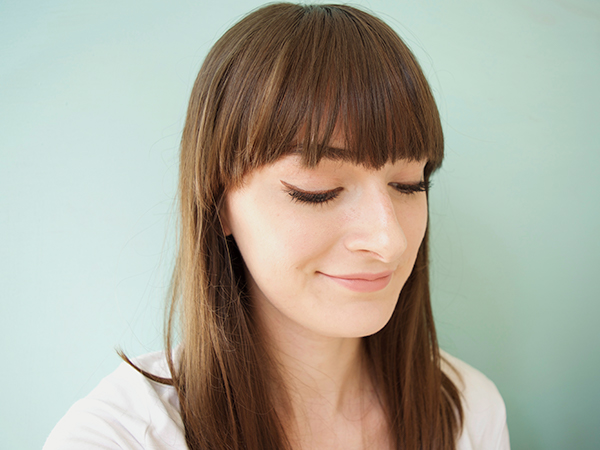
Next up is planning out the flick. Because everyone’s eyes are different, the exact way that I do my flick may look a little wonky on your eye. Just play with it a little bit until you figure out your perfect parameters. I start from the tip and draw inwards. This way I know exactly where my flick will end and I don’t end up with eyeliner on my eyebrow or something. For me, the perfect place for my wing to stop is just below the crease of my eye. With that in mind, I use the angle my lower lid makes (when looking straight out) to gauge placement. Then just draw in the flick.

You’re almost done! With the flick drawn in, look straight on in the mirror to make sure you like how it looks. Make any adjustments (cotton swaps and makeup remover are your friends) before finishing the liner. Then using the tip of your liner again, connect the flick to the lash line. Then stop! Seriously, give it a minute. Wait for your liner to dry before fully opening your eye again. It’s like asking for crazy liner transfer. You are set to go when your line has fully dried.
Love this article? For more beauty, style, travel, and trending topics check out The Luxury Spot on Facebook. Like us and we’ll love you back!