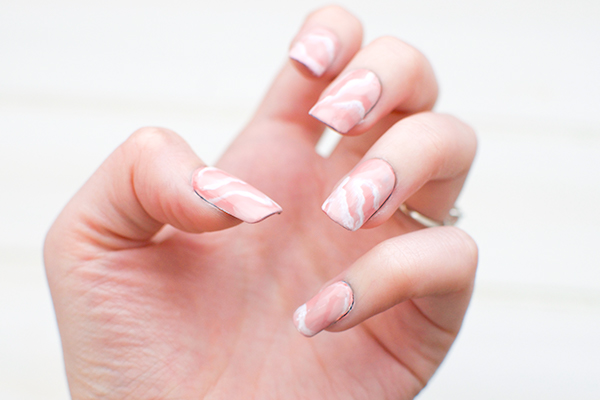

Pink quartz nails are having a moment on the internet, so we thought you’d appreciate a DIY guide to getting the look at home.
Forget marble nails, right now we’re all about the gorgeous trend of pink quartz nails. They’re like the much cuter, more vibrant sister to Carrera marble nails. Bonus, because pink quartz has a much more milky, blended appearance, these nails are way easier to DIY at home. Plus, they’re just gorgeous to add to your easy spring nails repertoire.

To get the perfect pink quartz nails you’ll need only three nail polish colors. You’ll also need your favorite base and top coat too, along with a very skinny striping brush. The polishes we chose are the Essence The Gel Nail Polish in Perfect Match, a medium salmon pink, and Sweet as Candy, a light baby pink, along with Sally Hansen Let’s Snow, a bright white.

Step 1: Base Color
To get these nails started, first apply your base coat and two thin coats of your darker pink polish. Although this shade is much darker than your typical pink quartz nail goals it adds a lot of depth to the finished look. Let this polish dry before moving on.
 Step 2: Add Texture
You know that almost marbled look that makes pink quartz so pretty? We’re starting to replicate that. Using your lighter pink polish create large organic lines over the nails. Think big pink clouds and drag your nail polish brush over the nail.

Keep going till you’ve covered the majority of the nail in the lighter pink. You do want to make sure that there is still some of the darker pink polish shining through so we keep that depth we were talking about earlier. Again, you want this to dry all the way before moving on. Turn the TV on. Do this in front of a Netflix series you need to catch up on.

Step 3: Add Highlights
Now for the hard part. To get those pretty thin white lines that really give the pink quartz look to your nails, you’ll need to be pretty precise with a thin brush. Coat your brush with white nail polish then follow some of the lines you created with the light pink polish.

You don’t want to outline all of the light pink areas, but enough to add extra brightness to the nails. We suggest feathering out the line a bit too, so you don’t get too much of an outlined look. This step is probably the most important to let dry all the way before the last step. You really don’t want those white lines to get streaky because it will totally ruin the quartz nails effect.

Step 4: Seal It
Last thing is to do one very thin layer of the light pink polish. This layer meshes everything else together and gives that almost milky appearance of pink quartz. Plus, it helps to lighten your nails a little bit more. Let it dry then do a good coat of your favorite long wearing top coat so you can rock your pink quartz nails for as long as possible.

Love this article? For more beauty, style, travel, and trending topics check out The Luxury Spot on Facebook. Like us and we’ll love you back!