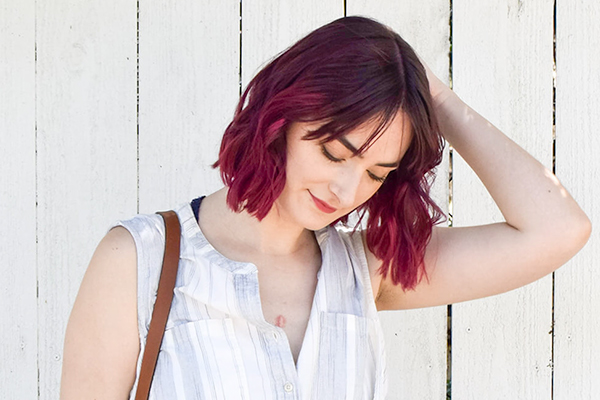

Pink ombre hair, people.
In the world of hair it seems that people are going for more and more natural shades. Highlights turned to ombre which turned to the sun kissed barely-there-balayage. But, sometimes going for the natural look can be kind of boring, which is why I finally bit the bullet and went for pink ombre hair. You can congratulate me later.

Step 1: Bleach
If your hair like my hair is on the darker side, bleach must be involved. It’s one of those bummer facts of life that if you want to add a fun color to dark hair, you’ll have to lighten it up first. I used this very interestingly packaged (leopard print and holographic? Why?) L’Oréal Féria Wild Ombré kit.

It demonstrates from this very photoshopped image that you can lighten your hair a good three-ish shades. To lighten my hair I followed the mixing instructions as written but went rogue on application.

Basically, I chose strands at random to lighten almost all the way to the roots. I tried to get a feathery effect to the top of the highlights so that it could be more like a bayalage than your standard highlights. It also helped to choose strands of varying thickness. I also chose more sections towards the front of my face, and less towards the back of my head.
Once all the highlights were on, I followed the instructions for doing an ombre to all of the ends of my hair. I let it sit for a good twenty minutes to lighten up to my desired level of basically light brown.

I was unsure if this light brown color would be enough to get the desired pink ombre hair effect but trudged on anyway because there is no rest for the wicked. And also, I knew the pink dye would wash out so I could always try again in a few weeks if it ended up not being light enough for my tastes.

Step 2: Pink Dye
Now the fun begins. I picked out this Punky Color Semi-Permanent hair dye in the shade Flamingo Pink. I think we can all agree that the color is more like magenta than flamingo pink, but that’s okay.
To get my desired color I mixed the dye with conditioner essentially to thin it out so the color could lighten up. To get a truly lighter color I could have mixed this dye with a lighter pink dye for a more significant change.

I applied the pink dye all over my hair from root to tip. Then I let it hang out for thirty minutes as I desperately tried to get the dye off my skin.
If, by chance, you have hair that is already light you’ll start out with the pink dye. You’ll need to be very careful to apply the dye from the ends of your hair upwards, and make sure to feather it out to get a pretty ombre, instead of that dip dye look.

After the pink dye set I rinsed and washed my hair to get all those dye remnants out. It took surprisingly long to rinse out all the pink dye, much longer than it took for the bleach. I used a color safe shampoo to wash just my roots. That way I wouldn’t have dye sitting on my scalp until the next time I washed my hair.
The initial results were much more of a burgundy red than I was going for. But after one good wash it lightened up to a lighter pinky shade.

Love this article? For more beauty, style, travel, and trending topics check out The Luxury Spot on Facebook. Like us and we’ll love you back!